Showing posts with label Yum. Show all posts

Tuesday, March 13, 2012

Chocolate - Cookie Dough Cake

The title just sounds delish doesn't it!!

We have a lot of family birthdays in March and so we had a little dinner party with some of Georgie's side last week to celebrate some of them.

I had been seeing TONS of pins (if you don't know what a pin is, well, then you should find out!) for cookie dough dip. Supposedly, it tastes like cookie dough, with out all the pesky raw eggs.

I had the brilliant (if I do say so myself) idea to use it as a filler between two chocolate cakes! Right now you are dying at the thought, I know. :)

For the chocolate cake, I always use the same recipe, One Bowl Chocolate Cake, from Allrecipes.com - this is also the recipe that is on the backside of the Hershey's Cocoa container. It is by far the BEST chocolate cake I have ever made or eaten. And it's beyond easy to make. I must have been having a bit of a blonde day, because when I made this, I put about a cup too much of cocoa powder in the batter! Silly me :) I decided to go ahead with it because the batter tasted good. The cake was fine, a lot more rich than usual but still yum-city!
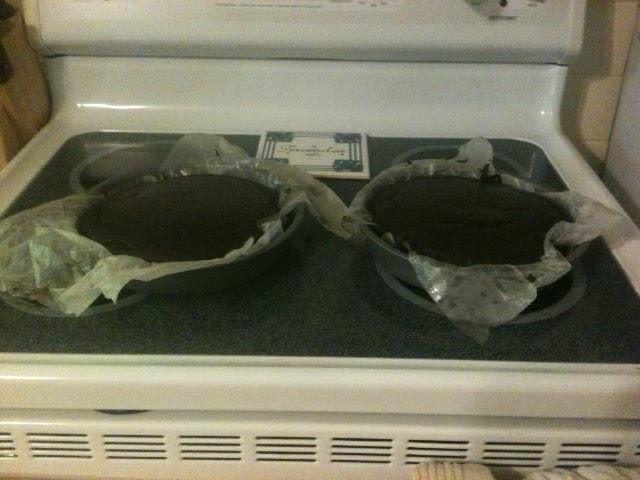

Here are my cakes just out of the oven. When I am stacking cakes, I like to line the pan with parchment paper because it makes getting them out of the pan a breeze! No matter how well I grease the pan or how long I let them cool, without the paper, I always have chunks of cake left in the pan!!!!

For this cake, I knew the filling would be thick (like cookie dough) so I wanted to make sure the layers were fully cooled before I tried to spread anything in between them. So, I made the filling and the frosting while the cakes were baking and put all of it in the fridge over night. I used Mom's Frosting for this, and you'll remember it works best if it's refrigerated anyway.

Now, for the best part, the cookie dough dip!

I began with this recipe from What Megan's Making......

When I was just about finished with her recipe, I realized my mixture could never be called a "dip" it was very thin and didn't look like her picture at all.... This never happens to me!!! My recipes always turn out...

So I read back over her recipe and realized that I used 3/4 cup of brown sugar instead of 1/3!!! What is wrong with me tonight, I tell ya!!!!

I decided I would try and salvage the dip because it tasted great..... So, I thought, flour! It's in cookie dough but wouldn't be dangerous to eat in the dip! I ended up adding a cup or a little more to get the consistency how I wanted it and because it dulled the flavor a bit, I added about 1/2 cup extra powdered sugar as well.

The result was perfect!!!!! I felt like at first, the dip tasted good but the cream cheese was a little too overpowering to actually call it cookie dough dip. After my mix up, though, it was almost identical!

The next day, I checked on all my ingredients while at home for lunch and found the cakes to be fine and the frosting perfect. The cookie dough filling, though, was too cold, too hard, not spreadable. I decided to set it out for the afternoon so it would soften up.

When I got home from work, everything was perfect and ready to be put together..

Here is my completed work.
I might make good tasting cakes, but pretty, they are not :)

Time to cut into it!


The result was amazing! Everyone raved about it and  I couldn't be more excited to have made something that I've never eaten before!!!! I will definitely be making this again!

Have a fab day!

Tuesday, January 24, 2012

Mom's Famous Frosting!

I was very fortunate to spend 2 awesome years with George's mom, Linda, getting to know her and learning from her.

One of the many amazing things I am grateful for? Her recipe box!!!! She had a fantastic variety of recipes that were just so, her! I am so lucky to have been exposed to (and eaten!) many of her signature dishes! She was always so willing to cook for anyone, anytime, and she always always made me food without onions!!! She knew how much I hated them! She understood my pickiness! She encouraged me to try new things (deep fried fish and tartar sauce, sweet potatoes, olives) but laughed with me when I hated them!

One way that George and I love to remember her is by cooking one of her favorites and enjoying it together!


Today I am sharing with you her awesome frosting recipe!

It is not only the yummiest frosting that you'll ever have, it's also the easiest to make!

Here's what you need:


Cool whip and instant pudding mix!

THAT'S IT!

**you need a little milk too**


Simply empty the cool whip in to a bowl, add the instant pudding mix and 1 cup of milk, and mix!


I told you it was the easiest to make, ever! Wait until you taste it! It's creamy and smooth but not overly sweet!!! It's the perfect compliment to your faveorite cake recipe! Linda always served this over "poke cake" - a cake that's infused with Jello! I'll show you that recipe some other time.

It comes out pretty thin when you first mix it, but if you put the bowl in the fridge for a few hours or overnight, it will firm back up to the consistency of cool whip!

Everytime I serve this frosting, people rave!

I have also mixed about 1/2 cup of peanut butter in and put them on chocolate cupcakes and it was fabulous! I have always wanted to make other varieties, like using chocolate pudding mix or adding almond extract, the possibilities here are endless!!!

When I made this the ther day, I didn't have a cake to frost, so I made a little yummy treat!

Graham crakers with strawberry slices, chocolate chips and frosting!

A little indulgent, but, yum :)

Go try some for your self! If you make a new flavor, be sure to come back here and tell us all how it turned out!

I promise to keep sharing Linda's recipe's with the world!


Thursday, January 19, 2012

Egg Cups!

Morning Y'all! (I was born in Texas and that alone gives me the right to say y'all, lol).

While I have no true problems with getting up early in the morning, I do have my routine down to a science and sleep until the last possible second! That doesn't leave a lot of time for breakfast, so I bring something with me and eat it at work. For years that has been a cup of yogurt - in the summer I'll bring homemade granola that I buy at the Farmer's Market to add to it -  but it doesn't get any more diverse than that!

I realize that breakfast is the most important meal of the day so when I saw my friend Andrea had pinned this on pinterest, I had to give it a try!


Photo is from Pinterst and the original recipe is posted at http://thesimpledelights.com/


First I preheated the oven at 400 and sprayed a muffin tin with cooking spray
Then I used Carl Budding ham pouches. Those pouches are 90 calories and have 10 thin slices in each pouch. I used two slices per muffin cup.
Then I cracked an egg in each ham cup.


I sprinkled some salt and pepper in each egg and cooked for 12 minutes.
After 12 minutes they looked not quite done to me, so I left them in for 2 more minutes.


Take note of this: I was wrong :) (george, don't expect me to say that again) they were done at 12 minutes because I like my egg yolks runny and these yolks were firm.

Georgie put some cheese on his right after they came out of the oven, it melted nicely!


Here's my yummy breakfast!

This recipe with the Carl Budding ham clocks in at 98 calories per cup!

I made 10 of them so I could put a stash in the fridge/freezer and take them to work with me.
This week on Monday, I warmed up my egg cup for a few moments in the microwave and it was just as yummy as the first time!

I'm so excited because it's an easy to make protein packed breakfast!

Yum! What do you eat for breakfast?

Friday, January 13, 2012

Homemade Mozzarella Sticks!

It's recipe time!!! I've recently discovered the wonder that is wonton wrappers and eggroll wrappers. You can find these two items at the grocery store in the specialty produce section (by the eggplant, artichokes, etc.). Bascially they are pre-cut squares of dough! You can make just about anything from them, eggrolls and wontons are just the beginning!

I've already made, pizza puffs (put the wonton wraps in a mini muffin tin and fill with pizza sauce, toppings - then pinch closed and bake - I'll blog post them sometime) and ham and cheese eggrolls cooked in the deep fryer (if you live where I do - I was copying the Round Ones from the Portside). Both recipes turned out amazing and were so easy!

Today we are making one of my favorites, Mozzarella sticks. Now, I have made these two ways: one version with eggroll wrappers in the oven and one with wonton wrappers pan fried in olive oil, today we are going with the 2nd version because they were much yummier and easier to eat!

You need:
String Cheese
Wonton wrappers
Egg wash (just an egg that is beaten - I actually didn't have any eggs today so I used melted butter).
Olive oil
Pizza Sauce (for dipping)

Start by unwrapping and cutting in half all of your string cheese.

Then place a pice of cheese in the center of a wrap.

To wrap them, first you fold the bottom corner up (like the picture on the right) then fold each side to the middle and roll up.


I wasn't able to take pictures of the folding process, so I found you this lovely diagram at http://polishvegetarian.blogspot.com/ 


When you get them all rolled up, use the eggwash (or melted butter if you are out of eggs!) to seal the last corner - make sure you get some under the corner and on top.


Pour enough olive oil in the bottom of a frying pan so that the cheese sticks can sit in the oil but not so it will be sumberged. - I like to use olive oil because it is better for you, but you could use vegetable oil if you wanted. You can also use a deep fryer if you have one.

Heat the oil on medium, this way the oil will be hot enough to brown the outside but it will also cook slow enough to melt the cheese.

When the oil is hot place your cheese sticks in the oil, fold side down. This way you are sealing that last fold in right away and don't have to worry about them unrolling when you flip.


When the bottoms are nice and golden brown, use tongs to flip them. Some cheese will ooze out when it's cooking (unless you are an amazing wrapper!) and that's okay.


When the 2nd side is browned you are all finished!

Serve them with some warmed up pizza sauce for dipping!


George gobbled them up at lunch time!
He also took the left overs to work with him! I'll let you know for sure, but I am guessing these are going to reheat pretty well!


Do you have any other ideas for eggroll and wonton wrappers?


:-)

Shawnie