Showing posts with label Upcycle. Show all posts

Tuesday, March 20, 2012

Upcycled Cuff Bracelet

My serious love for upcycling now includes jewelry!

I had a cuff bracelet that I was so in love with, I kept it in my purse all the time and wore it very often.  It was copper and it had flowers on top in the same copper with rhinestones in the middle of it, it went with everything!


Here is what it used to look like:

Turns out, it's not a good idea to keep a bracelet in your purse for very long. After a few weeks, half of the flowers broke off. :( I hung on to it though, hoping I could turn it into something great. Or, I just forgot to throw it away for so long and then I saw it months later and had a good idea. :)

I decided that I would wear the cuff upside down (with the opening on the bottom) and I'd cover it with left over yellow fabric from the bulletin board. I figured I'd find an earring or pendant at goodwill or vinnies to glue on top.

In actuality I never did find the right piece while thrifting, but I found this pretty little ditty on clearance at Michael's


$2.50 good deal!  Here is a shot of the cuff after Georgie helped me remove the flowers that hadn't broken...

I cut the yellow fabric into a strip about 1" wide, but I didn't like the frayed edges....  So I looked around my leftover craft bin and grabbed some ribbon (left over from the wedding) instead.

Here's the wrapping in progress:

I used a dab of glue at each end to secure the ribbon. Also, I used pliers to snap the circle off the top of the pendant and then just glued it on top.

Here it is all finished


I love it because the beige ribbon is very neutral and the decal is two shades of pink, very girly and simple with a vintage vibe. It's definitely my new go to piece!

What do you think?

Wednesday, February 1, 2012

Teacup Candles!

Hello Everyone!

Today on the blog, I am showing my first Martha Stewart Craft!

During Christmas, I was looking for some handmade gifts to create and I found this tutorial for Teacup Candles! Then a few weeks later I happen to find some adorable mini teacups at Vinnies!


Here's what you need.

Materials:
Teacups
Candles to melt down
Candle Wicks
Wick Sustainers

Tools:
Wooden Skewers
Tongs
Double Boiler
Candy Thermometer

I wanted to get half used candles from vinnies or goodwill because I like recycling but I couldn't find them. I ended up buying $1 candles at Michael's. I also found wicks that were already in sustainers, so I bought them together instead of separately.


For a double boiler, I always use two pans on top of the other, because I don't own an actual double boiler

The first thing you do is melt the candles. You'll want to bring the water in the bottom pan to a boil then reduce to a simmer. When you place the candles in the pot and they start melting, use the candy thermometer to keep the temperature to around 185 degrees to prevent burning.


Use the tongs to remove the old wicks.


Bend the top of the wicks around the skewer. Then use the skewer to dip the wick and sustainer into the melted wax and place it in the bottom of the tea cup.


When the wax is fully melted, pour evenly into the cups leaving 1/2 to an inch at the top.


Then let them harden for about 1 hour.
After that time, you'll notice that they wax doesn't harden evenly. To even it out, Martha suggests to poke holes around the wicks about 1/16 of an inch and then fill the cups with more melted wax until almost full, and let set again.

Of course, I didn't have enough wax to do this, so I just ended up with uneven wax! But as is my style, I like them un-perfect!


My Grandma collects old teacups, so I'm sending them with my mom to Florida to give to her!

I hope she likes them!


I loved making candles, so I'll definitely be making more in the future.
I'm pretty sure I ruined my sauce pan by melting wax in it, so it's really the only use I have left for it!

:) Happy Crafting!!


Thursday, January 26, 2012

Coaster Tiles!

I have seen many posts on Pinterest and craft websites for Coaster Tiles!

Put simply, they are bathroom (or kitchen) tiles that you attach scrapbook paper and use for coasters!

When George and I bought this house, I looked all over the place for coasters and never found the right ones!

It was a sign! Now I can make my own! Even more of a sign, George removed some of the white back splash tiles from our kitchen last year when he put in the new window, and he STILL HAD THEM!

I thought I'd have to buy new ones, but crafting and recycling........ sign me up!


Since our tiles are used, there was some outstanding grout around the edges. Georgie so kindly scraped it off for me. :)


Since the coasters had a smooth shiny surface, I spent some time scuffing them up. I porous surface takes glue much better than a smooth one!

For the paper, I chose two different but coordinating patterns.


Cutting the paper to size was by far the hardest part. If you try this, no doubt it will be easy as pie for you! I am a bit special when it comes to cutting in a straight line! I ended up placing the tiles upside down and cutting, that way they'd be bigger and need to be trimmed rather than being too short.


After all the cutting, I used my favorite Mod Podge to glue the paper down to the tile. Make sure you get the edges really well!


After letting them dry for 20 minutes or so, paint the Mod Podge all over to seal them from the top.


Don't forget, it's completely normal for the Mod Podge to be white when first painted on, but it dries clear and shiny! When they are drying, watch for edges curling and hold them down for a few moments, if they do.

After they are dry, take them outside and spray with clear coat.


Make sure you get the top and the edges!

After that dries, cut some felt and attach it to the back of the coasters with a hot glue gun.


And then you're done!


Perfect coasters, just my style :)


Tuesday, January 17, 2012

End Table Refinishing!

Now I am not trying to say that I am a Goodwill expert but.... Hello, my name is Shawn and I am a Goodwill addict.

"Hi Shawn, welcome to the group." Thank you, thank you!

So, it seems to me that on most Sunday's furniture is 50% off at Goodwill....

A while back, during our usual every other Sunday or so trip my mom and I spotted this end table for only $5!!!


I called George and he said, buy it! My plan while at the store was to take it home and paint it a nice dark brown chocolaty kind of color. When George took one look at this table he had other plans!


He wanted to strip off the unknown layers of paint and stain it instead! I was up for the challenge!


To strip the layers of paint, you just bush on the stripper, and the paint begins to bubble like the shot on the right.


Then scrape off the layers of paint! You may need to scrape as much as you can, then paint on more stripper, then scrape and so on until you most of the paint off. After that, George sanded the wood down to a nice smooth surface. Now, I'm calling this a DIY project but in reality, you need someone who knows a little bit about stripping and sanding. George is an exceptional carpenter and he has every tool imaginable. If you asked him, I'm sure he would say the sander that he used was invaluable. It would have been much more difficult to sand it by hand with paper alone.


Here is the little table with 9 lives all ready for stain! This guy had lived many times before, underneath the taupe color that it was when I bought it, was a deep dark blue and a muted green! We chose a dark rich red stain to coordinate with the other pieces in our living room.

After he was finished staining it, I applied the first coat of clear poly and he scuffed and did 2 more coats!


And here's where this little guy lives now in our living room!
What do you think? I Georgie did a good job, hey? Not just with the staining but also by indulging my thrifting, upcycling, blogging ways! Thanks Georgie. :)


Tuesday, January 10, 2012

T-Shirt Flowers!


And now it's time for the long awaited blog post for Tshirt flowers!!! These are the flowers that I used on my Yarn Wreath.

Once again this is a Pinterest inspired post (follow me - Shawniepatrica) and here is the site that I used to make them my first time.

Okay, here's what you need:


A tshirt in the color of your choice (this project needs about 2 inches across the bottom of any Tshirt - both front and back - and maybe a little bit of a 2nd row depending on the size of the shirt).
A flower pattern on card stock - as you can see from mine, it does not need to be special :)
Some kind of attachment piece, for this I am using a pin.
Felt.
A hot glue gun.


Using your pattern as a guide, cut out 9 squares of fabric.


Next you will cut flower shapes out of your fabric squares, I like to cut these in stacks of 3. Don't worry about making them all perfect.

You'll see on the right that I also cut out a small circle of felt. And that nothing I have cut, is perfect. :)


Put a dab of hot glue on the center of your felt.


You are going to glue your first 8 flowers in 2 layers of four. Fold each flower in half twice, making a heart like shape.


This is your bottom layer.
Place a 2nd dab of glue in the center.


Glue the 2nd layer on top of the first but place them so that the petals will be off center from each other.


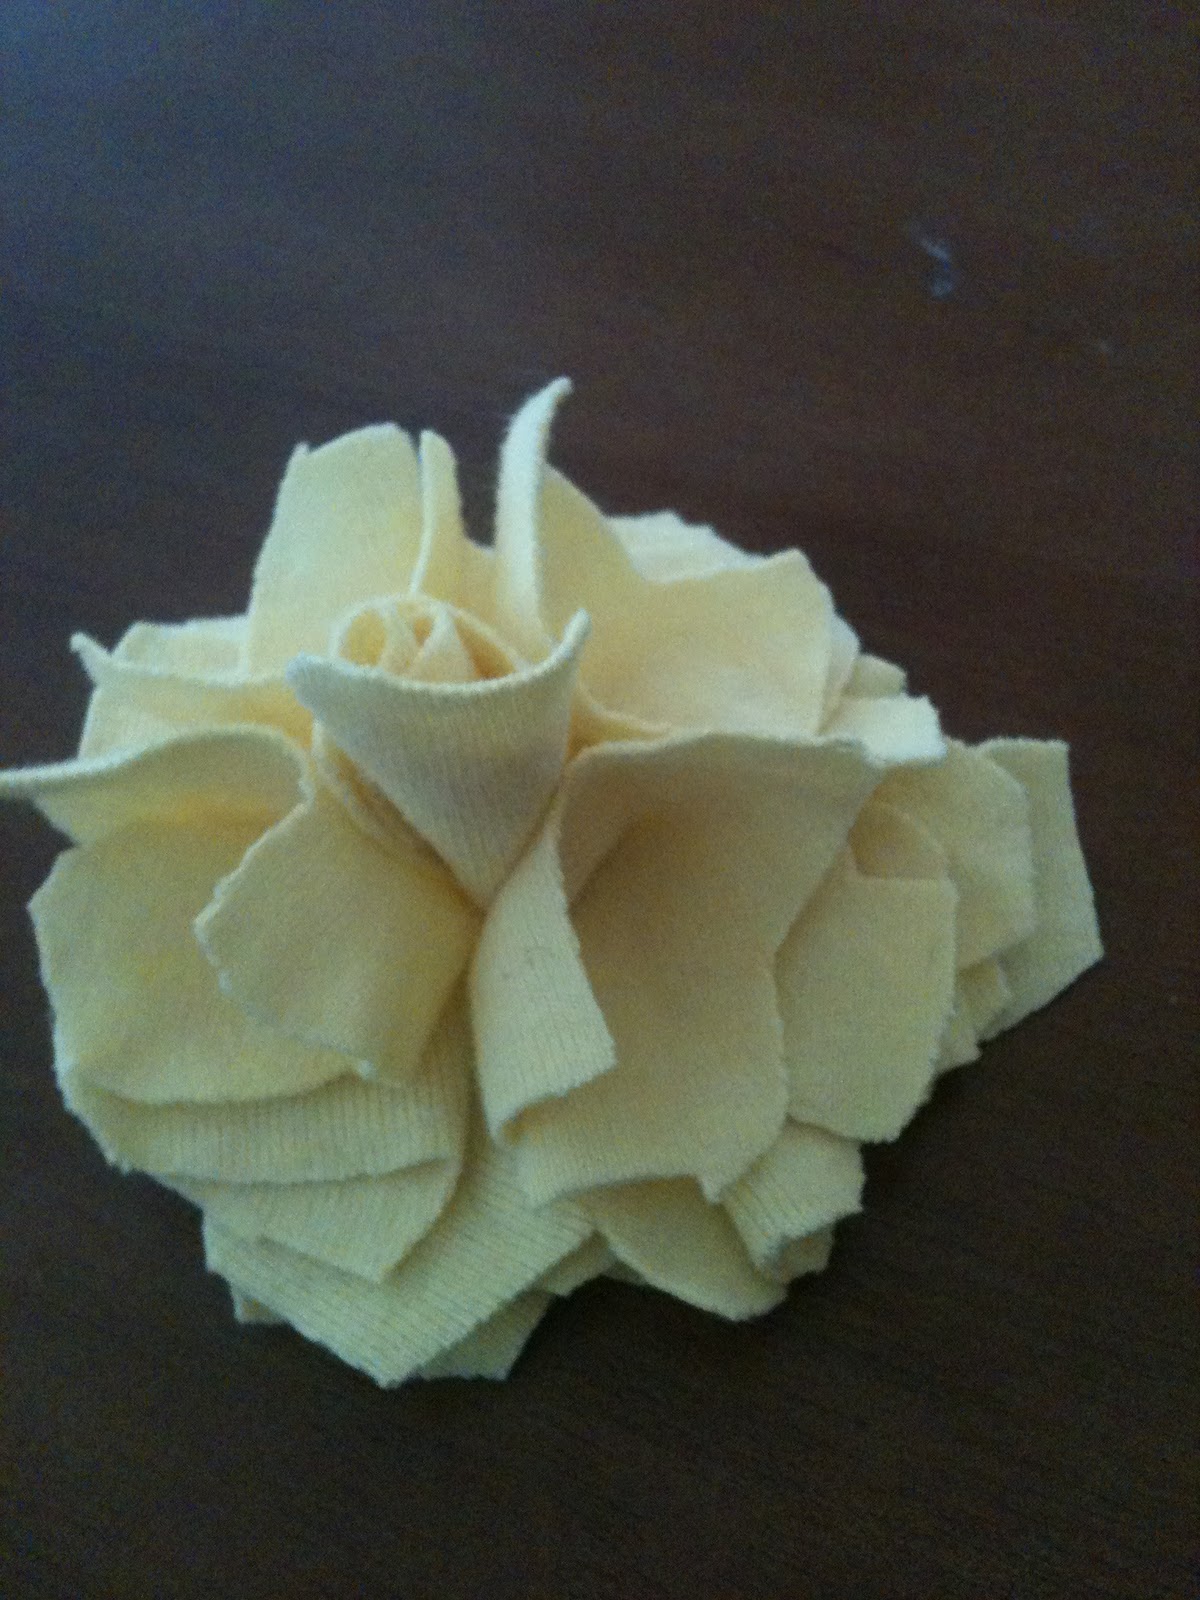
With your final flower, fold it in half as you did the first 8 but then roll it into a cone shape.


Use another dab of glue in the center and place the cone on top so that it stands upright.


Place a tiny bit of glue on a 2nd layer petal, then press the cone and the petal together like the picture on the right.


Do this will all four of the 2nd layer petals. 


Lastly, glue your pin to the underside of the felt and you are done!


Now the next time you need a cute flower for your hair, as a pin, to decorate your favorite Tshirt scarf, all you have to do is go to your closet, pick an old shirt and whip one up!!


I've now made: scarves, bracelets, necklaces and flowers (and was gifted a lovely headband, thank you Samantha Elizabeth), I wonder what else I can make out of old Tshirts?

Have a wonderful day!

--Shawnie