Wednesday, May 2, 2012

Earring Hanger

Hello All!

It's been a few weeks and I've missed my blogging!

But I am back now with new post about jewelry organization!

You might remember a while back when I made the Jewelry Board. It was a great addition to my closet! So much so, that I couldn't help but purchase more and more jewelry to fill it up!

This is what my Jewelry Board looked like last week.


Lots and lots of necklaces bunched up together. And my earrings hanging along the bottom.

Here is a second pile of jewelry over on my vanity. I found that I kept throwing my earrings on the vanity instead of hanging them on the jewelry board because it was just too difficult the way I set it up.

So, I had more jewelry and needed more room and my earrings were not easily accessible, this was a problem. I needed a solution that would be functional and also fit in my closet near my other jewelry.

I decided to make an earring holder that could hang from a clothes hanger! That way it could hang with my sweaters and tops and be right there for me choose the earrings of my choice each morning!

I set off to walmart to get some fabric.


I found these little pre-cut squares for only a $1, PERFECT!
Make sure you choose a thin fabric that your earrings can easily poke through.
I also picked up some pink ribbon because that's just how I roll.

So first I laid out the fabric and measured a hanger, I had to cut about an inch off.

Then I used the ribbon to make a pretty boarder around the fabric.
I ran out of ribbon with one length left to go, cause also that's just how I roll.


After the ribbon was done, I folded the top of the fabric over the bottom of the hanger and used my trusty hot glue gun to secure.

Pretty easy, hey?
After I was finished, I hung the hanger in the closet and started to arrange my earrings, by color of course!


Don't my earrings look pretty in their new home! You know what my first thought was? I need more earrings to fill it up!

But the extra space on my jewelry board gave me the opportunity to reorganize the necklaces and bracelets!
Everything is so much easier to use and find now!


Total Success!!!

Friday, April 13, 2012

St patty's day decor

For our St.Patty's day party, I also had a blast making some cute decorations. Some of them I've blogged about before, some are new!

Check 'em out!

This cute banner was so easy to make!


A few things that I did differently were:
1.) I used stickers from Michaels instead of printing on the card stock.
2.) instead of tissue paper, I used cupcake wrappers! So awesome, they are already round and themed for you!


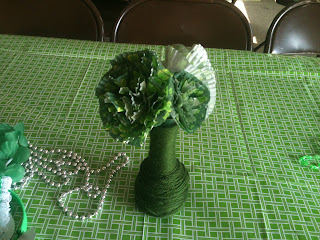
These are cupcake paper flowers. So easy to make and I used the same cupcake papers as I did for the banner!
I google searched for paper flowers and this awesome blog post is what I found.
She tried out six types of flowers and reviewed the process and the final product and she links back to the original tutorials for each type. Check it out!


I used regular cupcake papers and mini for two sized of flowers!
Notice the Yarn Vases!

It was so much fun rounding up all my ideas on Pinterest and trying them out one by one!
Gotta love that Pinterest!

Wednesday, April 11, 2012

St Patty's Day Party Food!


You may remember that last month, Georgie and I had our annual "I hate winter party" on St. Patty's day.  I was so excited to have a party with themed food! I set out on Pinterest to get ideas and recipes!

Here's what I came up with:


Mint Chocolate chip cookies! Here's the recipe.


Lucky Charms treats! Just like Rice Krispies treats but use Lucky's instead! This idea was all mine, no pinterest needed!


Aren't these chocolate covered pretzels adorable?
What did we do before you could buy M&Ms by the color?


The dessert side of the table!

Can't wait for my next themed party food.... 4th of July maybe?


Wednesday, March 28, 2012

Style it Yourself Necklace

I'm calling this post a SIY or style it yourself, instead of a DIY....

One of the things that I love about crafting and blogging, is that it has awaken the creative spirit inside me. I get inspired to try different projects all the time. When I go thrifiting, I see pieces in a whole new light!

Recently, while out shopping, my Sissy (sister in law) tried on an adorable necklace that she found just a bit too short for her liking. A few days later, I was a Michaels, digging in the clearance, in search of the perfect piece to finish my Upcycled Cuff Bracelet, when I saw a piece that reminded me of the necklace that Sissy didn't buy.

So I decided to try something new! For the first time ever, I bought individual pieces and put together a necklace for one of my favorites!
Here are the charms that I bought. The one on the right is the piece that inspired this necklace.


And the vessel for the adorable charms. I bough this 36" strand of chain and used pliers to cut it in half, because Sissy loves a perfectly 18" necklace. The findings are very easy to use and come in a variety of metal colors to match your every style! I didn't use the butterfly for this necklace, but I'm sure it will live on somewhere...

Here' I am wearing Sissy's new necklace:

I am calling this Style It Yourself instead of "do" because I didn't make anything here, just used my creativity to put some already made pieces together.

Sissy loved her new necklace!!!!

What do you think?

Thursday, March 22, 2012

Nifty Thrifty! St. Patty's Day Edition!


Georgie and I love to throw parties! For me it's all about decorating, cooking and choosing the perfect outfit!

Each year we have an "I'm sick of winter" party, usually with a Hawaiian theme. This year, though, our party was delayed because we were busy with very important endeavors, you know, like going to Jamaica!

So we decided to have a St. Patty's Day party! I don't wear much green, so I set out to my favorite, Goodwill, to find an outfit.

I am serious when I tell you that I tried on every green shirt in the place! I ended up coming home with this sweater/tunic without trying it on just because it was only $1!!!

Now before, I show you the pic I should tell you that I forgot to take a pic until a few hours into the party and we were feelin silly and had given me a little shamrock forehead art.


Also, please excuse my necklace hanging off to the side, it has a mind of it's own.


Here's the outfit rundown
Tunic: thrifted
Gold heart choker: thrifted
Long gold chain: vintage
(meaning I stole it from mama's closed about 10 years ago)
Brown leggings: forever 21
Boots: Gojane.com

The necklace combo was inspired by one of my favorite style bloggers: J's everyday fashion. Check her out.
Here's the inspiring pin.

Pinned Image

Talk on her Pin was iffy on this long/short necklace combo but it inspired me and I like the way it turned out on my St. Patty's day outfit!

Where do you find your fashion inspiration?

Tuesday, March 20, 2012

Upcycled Cuff Bracelet

My serious love for upcycling now includes jewelry!

I had a cuff bracelet that I was so in love with, I kept it in my purse all the time and wore it very often.  It was copper and it had flowers on top in the same copper with rhinestones in the middle of it, it went with everything!


Here is what it used to look like:

Turns out, it's not a good idea to keep a bracelet in your purse for very long. After a few weeks, half of the flowers broke off. :( I hung on to it though, hoping I could turn it into something great. Or, I just forgot to throw it away for so long and then I saw it months later and had a good idea. :)

I decided that I would wear the cuff upside down (with the opening on the bottom) and I'd cover it with left over yellow fabric from the bulletin board. I figured I'd find an earring or pendant at goodwill or vinnies to glue on top.

In actuality I never did find the right piece while thrifting, but I found this pretty little ditty on clearance at Michael's


$2.50 good deal!  Here is a shot of the cuff after Georgie helped me remove the flowers that hadn't broken...

I cut the yellow fabric into a strip about 1" wide, but I didn't like the frayed edges....  So I looked around my leftover craft bin and grabbed some ribbon (left over from the wedding) instead.

Here's the wrapping in progress:

I used a dab of glue at each end to secure the ribbon. Also, I used pliers to snap the circle off the top of the pendant and then just glued it on top.

Here it is all finished


I love it because the beige ribbon is very neutral and the decal is two shades of pink, very girly and simple with a vintage vibe. It's definitely my new go to piece!

What do you think?

Tuesday, March 13, 2012

Chocolate - Cookie Dough Cake

The title just sounds delish doesn't it!!

We have a lot of family birthdays in March and so we had a little dinner party with some of Georgie's side last week to celebrate some of them.

I had been seeing TONS of pins (if you don't know what a pin is, well, then you should find out!) for cookie dough dip. Supposedly, it tastes like cookie dough, with out all the pesky raw eggs.

I had the brilliant (if I do say so myself) idea to use it as a filler between two chocolate cakes! Right now you are dying at the thought, I know. :)

For the chocolate cake, I always use the same recipe, One Bowl Chocolate Cake, from Allrecipes.com - this is also the recipe that is on the backside of the Hershey's Cocoa container. It is by far the BEST chocolate cake I have ever made or eaten. And it's beyond easy to make. I must have been having a bit of a blonde day, because when I made this, I put about a cup too much of cocoa powder in the batter! Silly me :) I decided to go ahead with it because the batter tasted good. The cake was fine, a lot more rich than usual but still yum-city!


Here are my cakes just out of the oven. When I am stacking cakes, I like to line the pan with parchment paper because it makes getting them out of the pan a breeze! No matter how well I grease the pan or how long I let them cool, without the paper, I always have chunks of cake left in the pan!!!!

For this cake, I knew the filling would be thick (like cookie dough) so I wanted to make sure the layers were fully cooled before I tried to spread anything in between them. So, I made the filling and the frosting while the cakes were baking and put all of it in the fridge over night. I used Mom's Frosting for this, and you'll remember it works best if it's refrigerated anyway.

Now, for the best part, the cookie dough dip!

I began with this recipe from What Megan's Making......

When I was just about finished with her recipe, I realized my mixture could never be called a "dip" it was very thin and didn't look like her picture at all.... This never happens to me!!! My recipes always turn out...

So I read back over her recipe and realized that I used 3/4 cup of brown sugar instead of 1/3!!! What is wrong with me tonight, I tell ya!!!!

I decided I would try and salvage the dip because it tasted great..... So, I thought, flour! It's in cookie dough but wouldn't be dangerous to eat in the dip! I ended up adding a cup or a little more to get the consistency how I wanted it and because it dulled the flavor a bit, I added about 1/2 cup extra powdered sugar as well.

The result was perfect!!!!! I felt like at first, the dip tasted good but the cream cheese was a little too overpowering to actually call it cookie dough dip. After my mix up, though, it was almost identical!

The next day, I checked on all my ingredients while at home for lunch and found the cakes to be fine and the frosting perfect. The cookie dough filling, though, was too cold, too hard, not spreadable. I decided to set it out for the afternoon so it would soften up.

When I got home from work, everything was perfect and ready to be put together..

Here is my completed work.
I might make good tasting cakes, but pretty, they are not :)

Time to cut into it!


The result was amazing! Everyone raved about it and  I couldn't be more excited to have made something that I've never eaten before!!!! I will definitely be making this again!

Have a fab day!